Athena to read IoT data (part 3)
Introduction
This is a third (and the last one) post related to processing IoT data levaraging AWS Analytics services. In previous post we have created an IoT simulator that generates random data, pushes it to MQTT gateway and using an IoT action we store that raw data in a bucket.
In this post we post we will focus on raw data clean up and transformation, so the target system doesn't have to do additional input transformation to get the results. Things we need to fix in our raw data:
- partitioning data - currently we partition data based on a date we calculate from the timestamp of data arrival and not the timestamp of the sample itself. This may lead that some subset (very small, but still) of data is located in the wrong partition and may falsify the results.
- units unification - our simulator provides data in different units for temperature and pressure for each device. This can complicate analitycal queries.
- number of files - our simulator sends a lot of small files. Since we will be using Athena to query data such a setup is not efficient. Some sources says that recommended file size for Athena varies from 100MB to 2GB. We will not able to create such a big file with our samples, but we will learn technics we can use to control output file size.
- data clean up - we will restructure the original data format from hierarchical to flat one (table alike)
To achieve that, we will be using AWS Glue services. Before you start applying the infrastructure changes please get familair with the pricing. Unfortunatelly there is no free tier for the services we will be using, so if you want to follow up make sure you understand the costs!
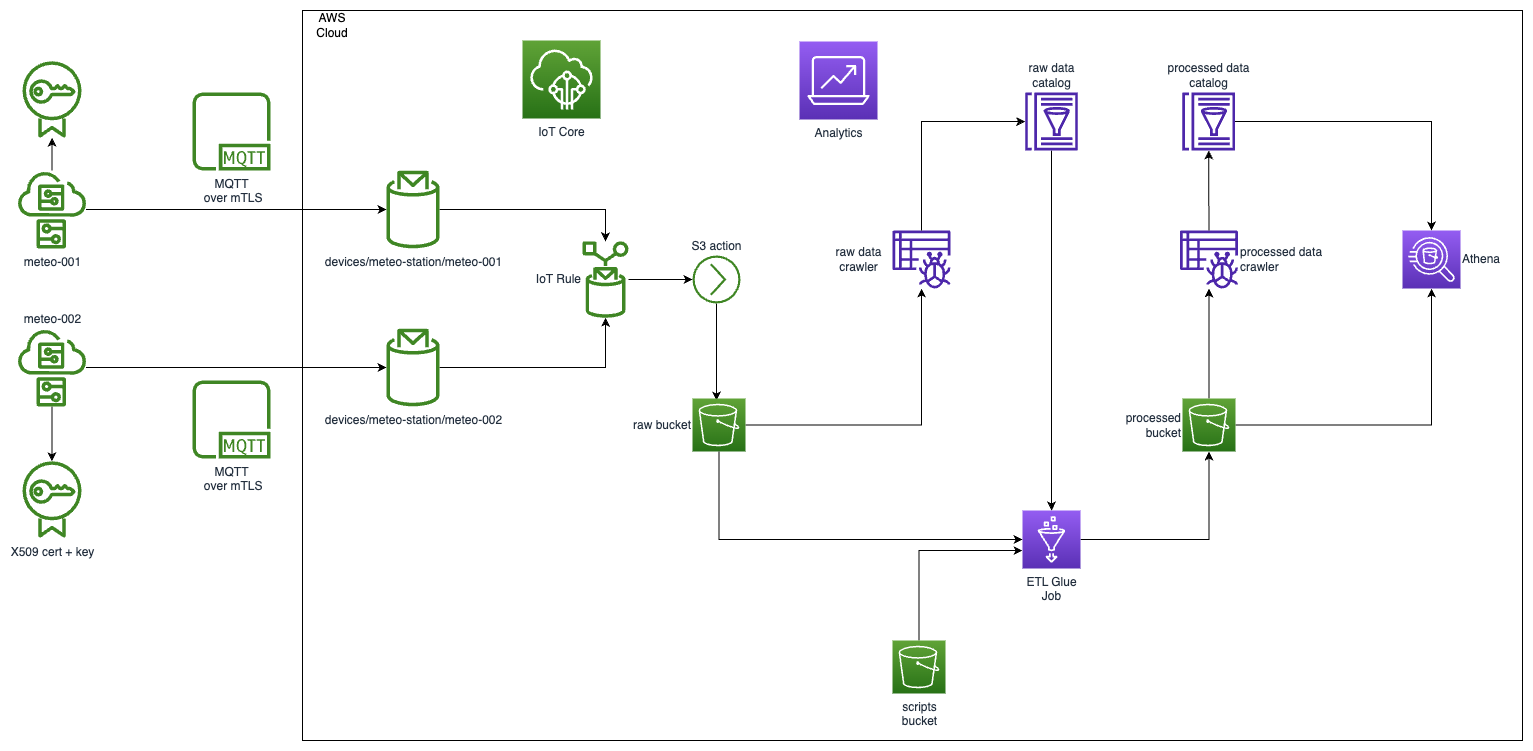
High level diagram for the solution look following.
Prerequisites
- Infrastructure created in first post
- Available data in the raw bucket created by a simulator created in the second post
Crawler
We will use crawlers to populate our Glue catalog with metadata about both raw and processed data. Since in both cases the functionality would be the same, let's extract that functionality to a separate module so we can easily re-use it.
Let's beging with defining variables for the module.
// ./modules/glue-crawler/variables.tf

variable "database_name" {
  description = "Glue catalog database name"
  type        = string
}

variable "table_name" {
  description = "Glue catalog table name"
  type        = string
}

variable "bucket" {
  description = "Bucket to be crawled"
}

variable "directory" {
  description = "location in S3 backet to crawl data from"
  type        = string
}
- database_name - name of the database where we want the crawler to store the results
- table_name - not needed for the crawler itself, but we will use it to build self explaining and unique name for the crawler itself
- bucket - bucket reference where the crawler should start scanning data
- directory - the exact location withing the backet to start crawling data from
The next step would be to define IAM role for our bucket. Here we will re-use AWSGlueServiceRole, but we will extend it with extra permission required to list and get files from the source backet.
Let's start with creating a custom role extanding AWSGlueServiceRole that can be assumed by glue.amazonaws.com
// ./modules/glue-crawler/iam.tf

data "aws_iam_policy_document" "glue_assume_role_policy" {
  statement {
    actions = ["sts:AssumeRole"]

    principals {
      type        = "Service"
      identifiers = ["glue.amazonaws.com"]
    }
  }
}

resource "aws_iam_role" "glue_crawler_role" {
  name               = "glue-crawler-${var.database_name}-${var.table_name}-role"
  assume_role_policy = data.aws_iam_policy_document.glue_assume_role_policy.json
}

resource "aws_iam_role_policy_attachment" "glue_service_attachment" {
  policy_arn = "arn:aws:iam::aws:policy/service-role/AWSGlueServiceRole"
  role       = aws_iam_role.glue_crawler_role.name
}
Since the role would be created per module, we need to ensure the name will be unique for each.
If we have that done, we need to make sure the crawler can list and get files from the bucket and the location we specified as an input variable. Let's create an IAM policy document for that and add it to the role we created.
// ./modules/glue-crawler/iam.tf

data "aws_iam_policy_document" "glue_read_source_bucket_policy" {
  statement {
    sid       = "AllowReadData"
    actions   = ["s3:Get*", "s3:List*"]
    resources = ["${var.bucket.arn}/${var.directory}", "${var.bucket.arn}/${var.directory}/*"]
  }
}

resource "aws_iam_role_policy" "glue_crawler_role_allow_source_read" {
  name   = "allow-source-read"
  role   = aws_iam_role.glue_crawler_role.name
  policy = data.aws_iam_policy_document.glue_read_source_bucket_policy.json
}
The above IAM role should satisfy our crawler's requirements. We can now focus on creating the crawler itself.
We will use aws_glue_crawler resource. In our case the following definition would be sufficient
// ./modules/glue-crawler/main.tf

resource "aws_glue_crawler" "location_crawler" {
  name          = "${var.database_name}_${var.table_name}_crawler"
  database_name = var.database_name
  role          = aws_iam_role.glue_crawler_role.arn

  schema_change_policy {
    delete_behavior = "LOG"
    update_behavior = "LOG"
  }
  recrawl_policy {
    recrawl_behavior = "CRAWL_NEW_FOLDERS_ONLY"
  }

  s3_target {
    path = "s3://${var.bucket.id}/${var.directory}"
  }
}
We will be running it on demand, so no schedule definition found. Also, we know the schema for our data (we will define it on the table level later one), that is why the schema_change_policy for both behaviours is set to LOG only. Last, but no least - recrawl_policy - since the nature of our data is additive only, we do not need to scan all folders every time. To save some time and reduce cost, we will be scanning only new folders to create required partitions.
Also, our module will output some helper variables that would make our life easier when it comes to glue table definition. So, add outputs.tf with the following content.
// ./modules/glue-crawler/outputs.tf

output "table_name" {
  value = var.table_name
}

output "s3_location" {
  value = "s3://${var.bucket.id}/${var.directory}/"
}
And that would be it for the glue-crawler module. Now, it's time to use it to populate our raw metadata catalog.
Glue RAW data
We will define here the database and a table to store our raw data. Starting point would be a glue database and a crawler:
// ./glue_raw.tf

resource "aws_glue_catalog_database" "meteodata_raw_database" {
  name = "meteodata_raw"
}

module "meteodata_raw_meteo_station" {
  source = "./modules/glue-crawler"

  database_name = aws_glue_catalog_database.meteodata_raw_database.name
  table_name    = "meteo_station"
  bucket        = aws_s3_bucket.raw_bucket
  directory     = "meteo-station"
}
The clawler will scan the meteo-station directory in our raw bucket and update the meteo_station table defined in meteodata_raw. We do not have the table definition yet, so let's add one. For that we will use aws_glue_catalog_table resource.
// ./glue_raw.tf

resource "aws_glue_catalog_table" "meteodata_raw_meteo_station_table" {
  name          = module.meteodata_raw_meteo_station.table_name
  database_name = aws_glue_catalog_database.meteodata_raw_database.name
  table_type    = "EXTERNAL_TABLE"

  partition_keys {
    name = "device_id"
    type = "string"
  }

  partition_keys {
    name = "date"
    type = "string"
  }

  parameters = {
    "classification"              = "json"
    "compressionType"             = "none"
    "typeOfData"                  = "file"
    "partition_filtering.enabled" = "true"
  }

  storage_descriptor {
    location      = module.meteodata_raw_meteo_station.s3_location
    input_format  = "org.apache.hadoop.mapred.TextInputFormat"
    output_format = "org.apache.hadoop.hive.ql.io.HiveIgnoreKeyTextOutputFormat"

    ser_de_info {
      serialization_library = "org.openx.data.jsonserde.JsonSerDe"
    }

    parameters = {
      "classification"  = "json"
      "compressionType" = "none"
      "typeOfData"      = "file"
    }

    columns {
      name = "deviceid"
      type = "string"
    }

    columns {
      name = "timestamp"
      type = "bigint"
    }

    columns {
      name = "values"
      type = "array<struct<name:string,unit:string,value:int>>"
    }
  }
}
The table we are creating will be partitioned by device_id and data. This is a derivative of keys, under which we store files in s3 (e.g. s3://iot.raw.cloudsoft.com.pl/meteo-station/meteo-001/2023-03-18/1679176900185.json). Parameters and storage description I think are mostly self explanatory. Maybe partition_filtering.enabled might not be so obvious, but this parameter would be required by the below resource.
// ./glue_raw.tf
resource "aws_glue_partition_index" "meteodata_raw_meteo_station_table_idx" {
  database_name = aws_glue_catalog_database.meteodata_raw_database.name
  table_name    = module.meteodata_raw_meteo_station.table_name

  partition_index {
    index_name = "device_id_date_idx"
    keys       = ["device_id", "date"]
  }
}
This is needed to speed up our Athena queries (it's like regular database index). You can create a maximum of 3 partition indexes.
We have just created all resources to create and update raw data catalog.
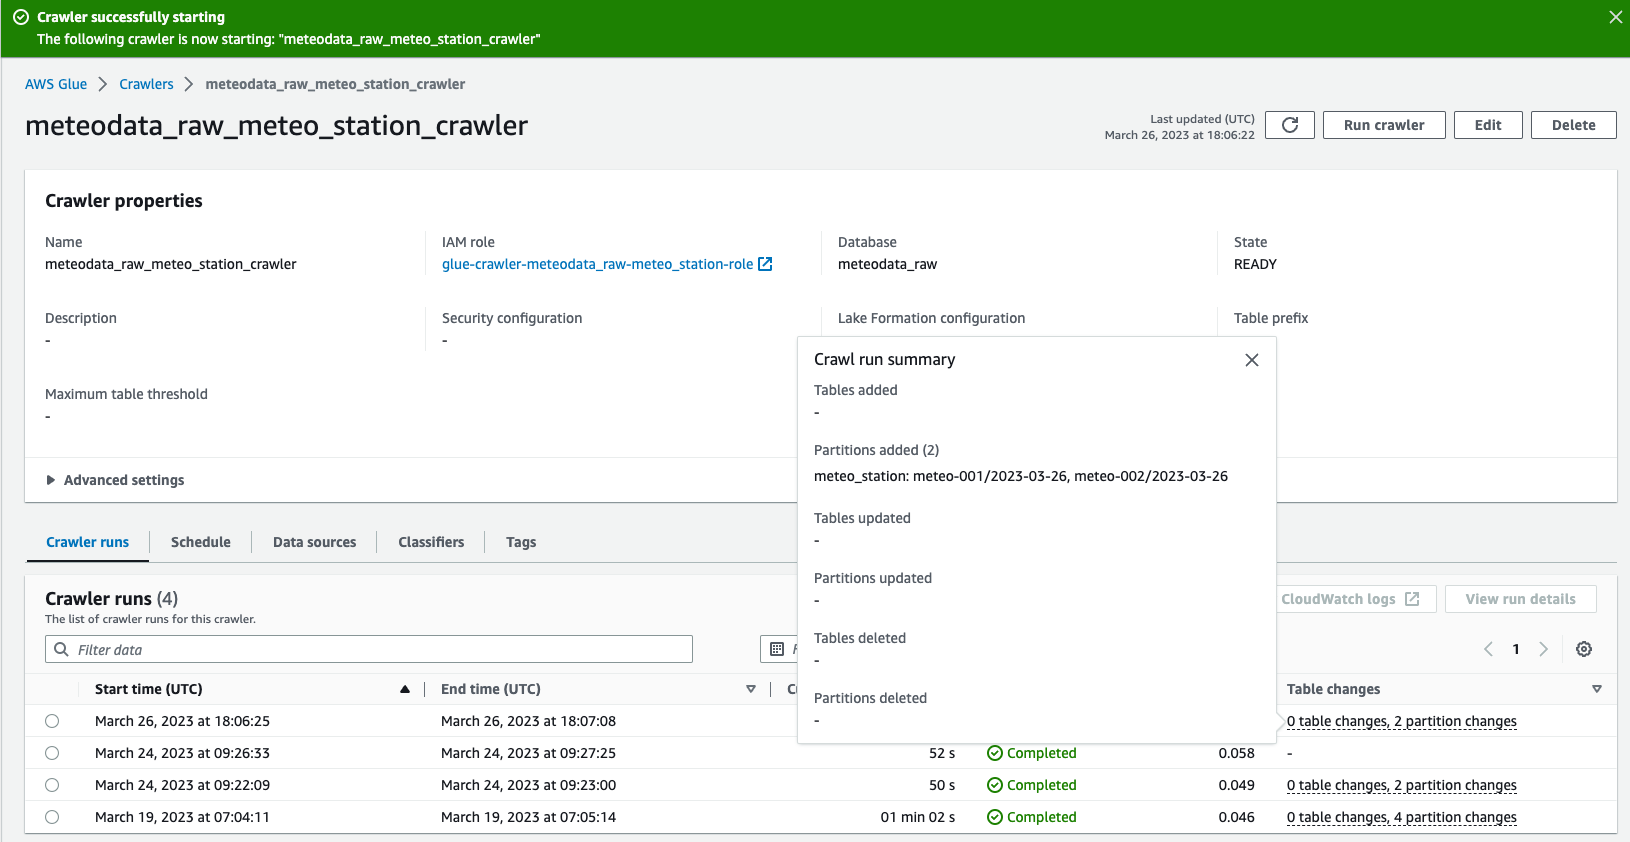
You can apply the terraform changes. If this is done, you can navigate to AWS Console->Crawlers and run meteodata_raw_meteo_station_crawler. It should complete with success and update meteo_station table with all discovered partitions.
We can now go to Athena and see how our raw data looks like. To do so, please run an example query using raw database. If this is your first Athena run, please setup a bucket for query output.
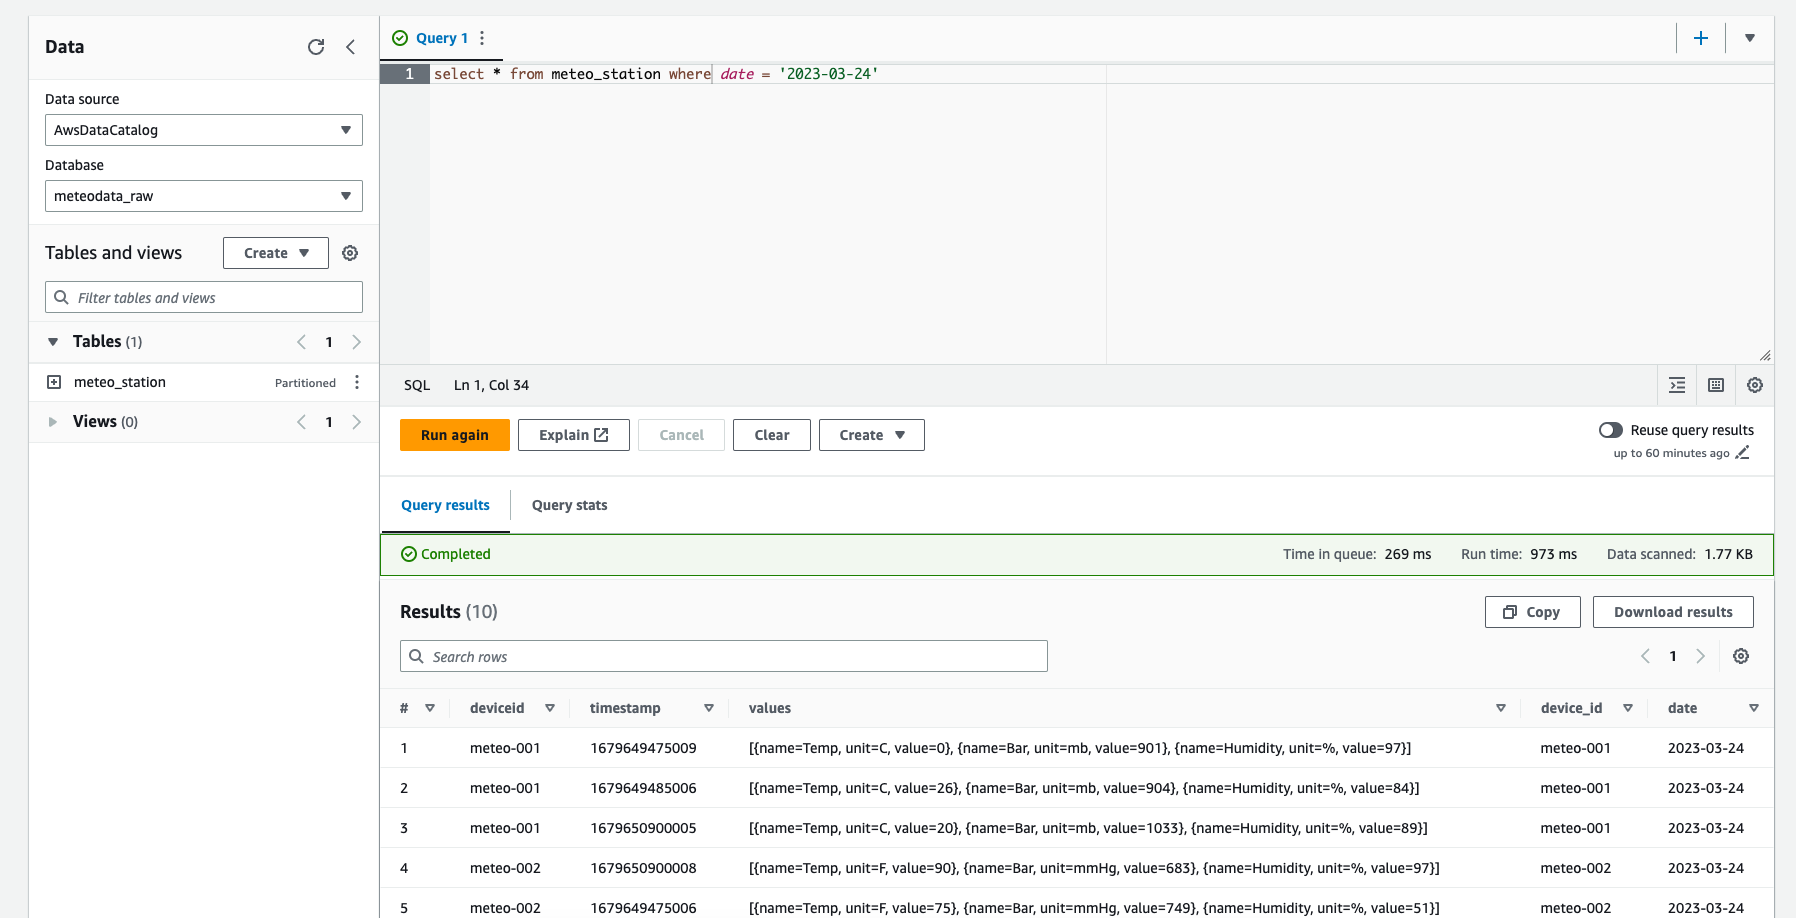
As you can see, there are some issues with our data:
- duplicated information for device identifier (one comes from the partition definition, the other from the payload)
- different units for the values
- and some other
We will take care about that in the next section.
Glue ETL Job
AWS Glue jobs come in three flavours: Spark, Streaming ETL, and Python shell.
- A Spark job - runs in an Apache Spark environment managed by AWS Glue to process data in batches. It supports jobs written in Python and Scala
- A streaming ETL job - similar to a Spark job, except that it works on data streams
- A Python shell job - runs Python scripts as a shell to perform etl-like job that does not require Apache Spark envirnoment
In our case, we will select the first job type with Python as our supporting language.
The requirements for the job are:
- support additive nature of our data, so that we process only new files
- unify units
- F to C for a temparature
- mmHg and mbar to kPa for a pressure
- flatten the results, so that temperature, pressure and humidity are stored in their own columns
- remove redundant data (deviceid)
- repartition based on a sample timestamp (not the arrive timestamp)
- reduce number of files, so that Athena has less files to scan
Create a job.py file in resurces directory and start putting some content to it.
// resources/job.py

import sys
from awsglue.transforms import *
from awsglue.utils import getResolvedOptions
from pyspark.context import SparkContext
from awsglue.context import GlueContext
from awsglue.job import Job
from pyspark.sql import types as t
from pyspark.sql.functions import when, to_date

args = getResolvedOptions(
    sys.argv, ['JOB_NAME', 'glue_database', 'glue_table', 'cold_storage'])

sc = SparkContext()
glueContext = GlueContext(sc)
spark = glueContext.spark_session
job = Job(glueContext)
job.init(args['JOB_NAME'], args)

print("Starting ETL job")
We started with adding a couple of imports that would be required for the job later on.
In one of the first lines we use getResolvedOptions to make the job configurable. We want to pass on:
- job name
- glue database where the table name is stored
- glue table name to read metadata from
- s3 location to store processed data
Next, we create a spark session out of the glue context and initialize a glue job. The job sets the configuration and tracks different states of the processing. You can create an etl task without a job, but best practice is to initialize it in the beggining of the file and commit the state at the end of the processing.
One of the features, which is required to meet our requirements is a bookmark. It will help us to support additive nature of our data.
In the next step we will start defining input data for our job.
ETL Glue job operates on Dynamic Frame, however to meet all the requirements we will convert it to regular Spark DataFrame.
// resources/job.py

def dataframe_from_catalog(ctx, database, table):
    dynamic_frame = ctx.create_dynamic_frame.from_catalog(
        database=database,
        table_name=table,
        transformation_ctx="meteo_data_etl_ctx")
    return dynamic_frame.toDF()

meteostation_df = dataframe_from_catalog(glueContext, args["glue_database"],
                                         args["glue_table"])

if len(meteostation_df.take(1)) != 0:
    # we will add a processing here
else:
    print("No data to process")

print("All done!")

job.commit()
dataframe_from_catalog creates a DataFrame from a glue catalog (based on the information we will pass on the job). It is worth mentioning that transformation_ctx is required in order to make bookmarks working.
We are checking if the have data to process. If not, we will log a relevant log entry. Otherwise, we will start processing the data frame to satisfy our requirements. We also finishing off the job with the debug information and commiting its status to make sure the progress has been tracked.
Now, let's focus on the part for a condition where the condition if len(meteostation_df.take(1)) != 0 is true.
// resources/job.py

  meteostation_df = meteostation_df.drop("date")
  meteostation_df = meteostation_df.drop("deviceid")
  meteostation_df = add_temperature_column(meteostation_df)
  meteostation_df = add_pressure_column(meteostation_df)
  meteostation_df = add_humidity_column(meteostation_df)
  meteostation_df = add_date_column(meteostation_df)
  meteostation_df = meteostation_df.drop("values")

  meteostation_df.show()
So, we step by step clean up our data and display the frame in the last step. Let's see an example function to add a column, e.g. add_temperature_column
// resources/job.py

f_to_c = lambda x: (x - 32) * 5 / 9

def add_temperature_column(meteostation_df):
    return meteostation_df.withColumn(
        "temperature",
        when(meteostation_df.values[0].unit == 'F',
             f_to_c(meteostation_df.values[0].value)).otherwise(
                 meteostation_df.values[0].value))
Using Spark DataFrame api we translate the value from an array to it's own column. Also, using the when expression, we can detect if unit translation is required (in case it is F). And if so, we converting it to C accrdingly.
The remaining converting functions are similar, so we will skip them here (all the code available in the github).
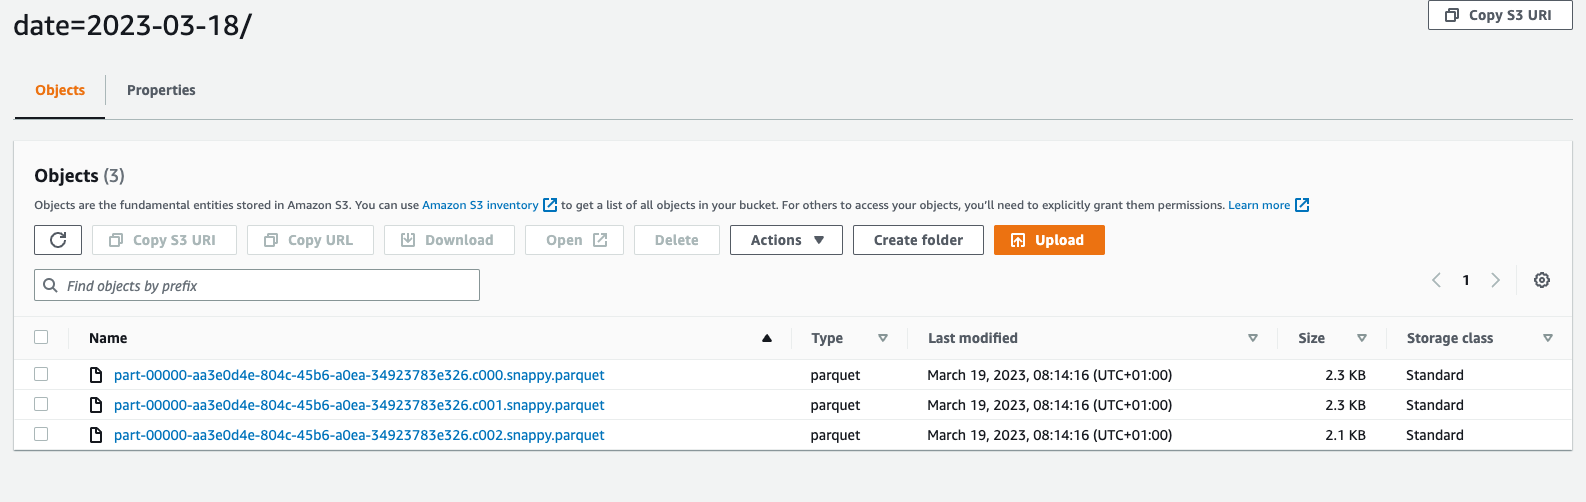
And the last requirement to meet is the output file size. There is number of different ways to control an output file size. One of them is to define a number of records for a single file. This can be controlled by maxRecordsPerFile option for a write operation on DataFrame. We also should ensure the files are stored in the most efficient way. In that case, we will select a parquet format with a snappy compression.
// resources/job.py

...

meteostation_df.show()

meteostation_df.repartition(1).write.option(
        "compression", "snappy").option("maxRecordsPerFile", 50).partitionBy(
            "device_id", "date").mode("append").parquet(args["cold_storage"])
We set the maxRecordsPerFile to 50, we still want the data to be partitioned by device_id and date. All the results will be stored to the bucked passed on as a paramter to the job.
And that is all for the job. We have covered all the requirements we defined above.
Now, we need to create terraform resources to create and deploy the job to AWS Glue service.
We will start with the defining a bucket for uploading ETL jobs as well as the job file itself.
// glue_etl.tf

resource "aws_s3_bucket" "etl_scripts_bucket" {
  bucket = "etl-scripts.your-fancy-name-here"
}

resource "aws_s3_bucket_acl" "etl_scripts_bucket_acl" {
  bucket = aws_s3_bucket.etl_scripts_bucket.id
  acl    = "private"
}

resource "aws_s3_object" "etl_job_script" {
  key    = "scripts/etl/job.py"
  bucket = aws_s3_bucket.etl_scripts_bucket.id
  source = "resources/job.py"
  etag   = filemd5("resources/job.py")
}
Please remember to update a bucket name to be unique in the whole region. We use aws_s3_object resource to upload a job.py file stored in the local repository to s3 on the terraform apply.
If we are with buckets, we should also create a bucket where the ETL job will store transformed data. Let's go back to iot.tf and add
// iot.tf

resource "aws_s3_bucket" "cold_bucket" {
  bucket = "iot.cold.your-fancy-name-here"
}

resource "aws_s3_bucket_acl" "cold_bucket_acl" {
  bucket = aws_s3_bucket.cold_bucket.id
  acl    = "private"
}
Next step is IAM permission setup. We need to make sure a job has a permission to read a bucket with the script, read all raw data as well as write access to the cold bucket. Besides that, it has to have all the permission defined for the glue service role.
// glue_etl.tf

data "aws_iam_policy_document" "etl_job_bucket_policy" {
  statement {
    sid       = "AllowReadScript"
    actions   = ["s3:Get*", "s3:List*"]
    resources = ["${aws_s3_bucket.etl_scripts_bucket.arn}", "${aws_s3_bucket.etl_scripts_bucket.arn}/*"]
  }

  statement {
    sid       = "AllowPutData"
    actions   = ["s3:Get*", "s3:List*", "s3:Put*"]
    resources = ["${aws_s3_bucket.cold_bucket.arn}", "${aws_s3_bucket.cold_bucket.arn}/*"]
  }

  statement {
    sid       = "AllowReadRawData"
    actions   = ["s3:Get*", "s3:List*"]
    resources = ["${aws_s3_bucket.raw_bucket.arn}", "${aws_s3_bucket.raw_bucket.arn}/*"]
  }
}

data "aws_iam_policy_document" "glue_assume_role_policy" {
  statement {
    actions = ["sts:AssumeRole"]

    principals {
      type        = "Service"
      identifiers = ["glue.amazonaws.com"]
    }
  }
}

resource "aws_iam_role" "etl_job_role" {
  name               = "meteo-etl-job-role"
  assume_role_policy = data.aws_iam_policy_document.glue_assume_role_policy.json
}

resource "aws_iam_role_policy_attachment" "etl_job_service_attachment" {
  policy_arn = "arn:aws:iam::aws:policy/service-role/AWSGlueServiceRole"
  role       = aws_iam_role.etl_job_role.name
}

resource "aws_iam_role_policy" "etl_job_cold_bucket_role_allow_s3_read" {
  name   = "allow-s3-bucket-policy"
  role   = aws_iam_role.etl_job_role.name
  policy = data.aws_iam_policy_document.etl_job_bucket_policy.json
}
If we have that, we can create a job itself. For that, we will use aws_glue_job resource.
// glue_etl.tf

resource "aws_glue_job" "meteostation_etl_job" {
  name              = "meteostation-etl"
  role_arn          = aws_iam_role.etl_job_role.arn
  timeout           = 60
  number_of_workers = 2
  max_retries       = 1
  worker_type       = "G.1X"
  glue_version      = "4.0"

  command {
    script_location = "s3://${aws_s3_bucket.etl_scripts_bucket.bucket}/${aws_s3_object.etl_job_script.key}"
  }

  default_arguments = {
    "--python_version"      = "3.9"
    "--glue_database"       = aws_glue_catalog_database.meteodata_raw_database.name
    "--glue_table"          = module.meteodata_raw_meteo_station.table_name
    "--cold_storage"        = "s3://${aws_s3_bucket.cold_bucket.bucket}/meteo-station"
    "--job-bookmark-option" = "job-bookmark-enable"
  }
}
We need to ensure a job name is unique in our account. We assigne the role we have created already. Some runtime parameters regarding worker, re-tries, etc. (please refere to the terraform documentation to get better understanding of them).
The command block defines a command for our job. We define here the type of the job (one from the three) as well as the script location on the S3. Since the default type is glueetl we could skip that setting.
And the last but not least, arguments to pass on to the job. There is a few of them the job expects as well as runtime parameters to force particular python version and enabling bookmarks. Please make sure names of the ones we pass on the the job matach the values in the job.py.
We can now apply the changes and go to AWS Glue console to see and run the job.
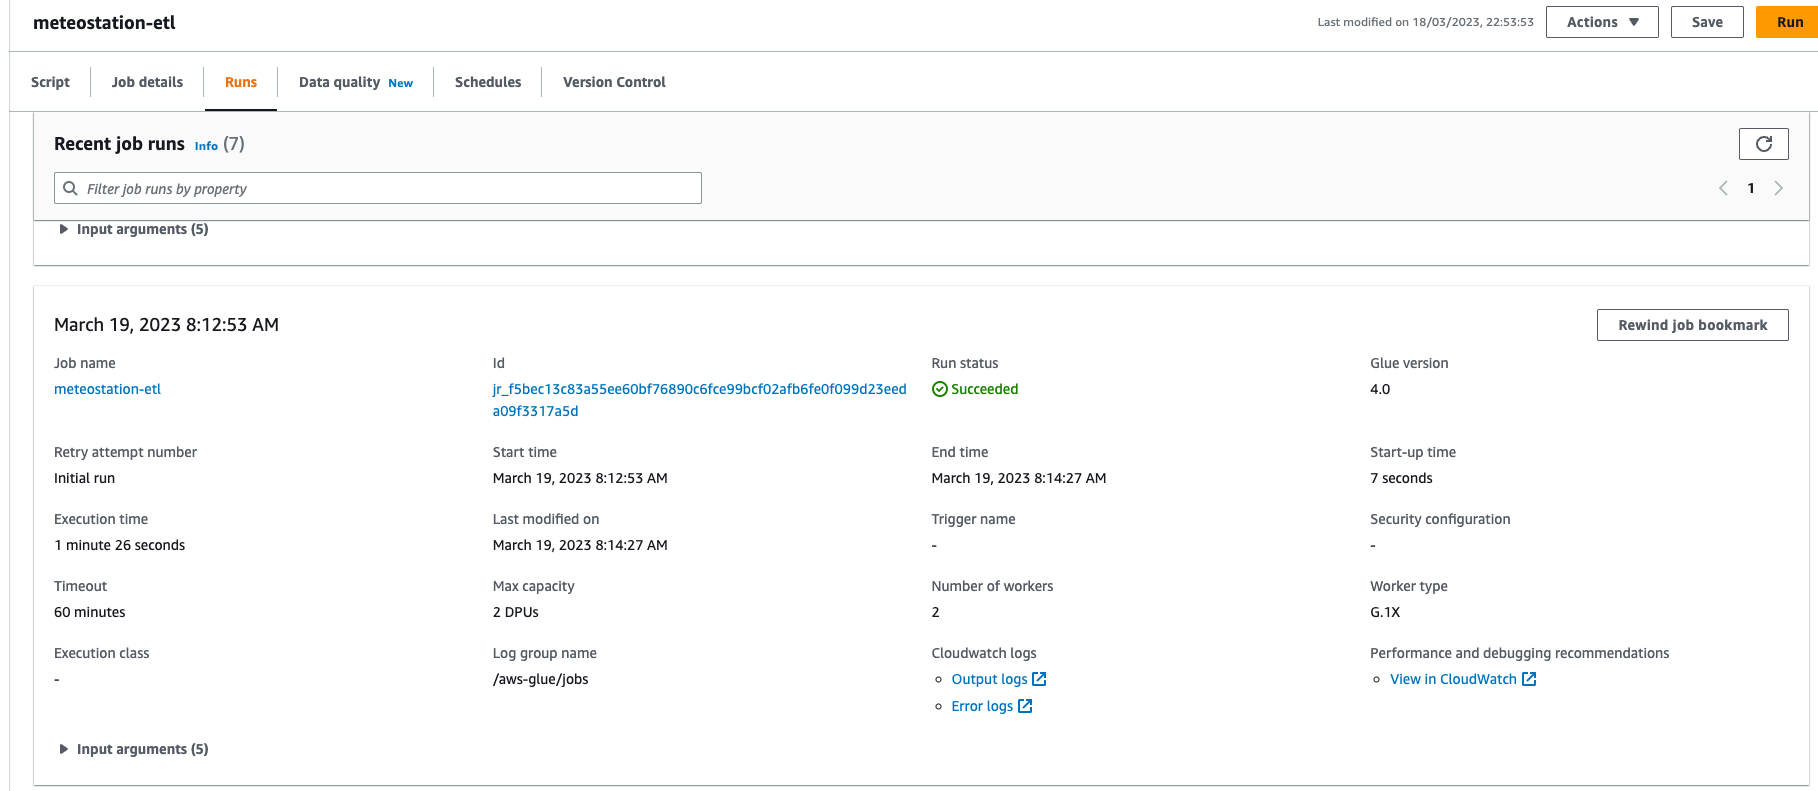
If all good, parquet files should be created in the cold bucket.
Now, it's time to expose processed data to Athena.
Glue Cold data
We already know what to do to make S3 content available for Athena. Basically, we will repeat the same steps we have done to expose raw data to ETL job.
Let's start with creating glue database and a crawler using the module we already prepared.
// glue_cold.tf

resource "aws_glue_catalog_database" "meteodata_cold_database" {
  name = "meteodata_cold"
}

module "meteodata_cold_meteo_station" {
  source = "./modules/glue-crawler"

  database_name = aws_glue_catalog_database.meteodata_cold_database.name
  table_name    = "meteo_station"
  bucket        = aws_s3_bucket.cold_bucket
  directory     = "meteo-station"
}
Next step is to create a table for S3 metadata. There would be a few small differences if we compare it with the raw table definition. The difference is mainly caused by a file type the crawler will be scanning as well as the schema of the data.
In case of raw data we read json files. Now, we will be reading compressed parquet files. As a result, storage_descriptor has to be updated accordingly. Also, the meteo values (temperature, atmospheric pressure and humidity) have their own columns, which is reflected in the schema definition.
// glue_cold.tf

resource "aws_glue_catalog_table" "meteodata_cold_meteo_station_table" {
  name          = module.meteodata_cold_meteo_station.table_name
  database_name = aws_glue_catalog_database.meteodata_cold_database.name
  table_type    = "EXTERNAL_TABLE"

  partition_keys {
    name = "device_id"
    type = "string"
  }

  partition_keys {
    name = "date"
    type = "string"
  }

  parameters = {
    "classification"  = "parquet"
    "compressionType" = "snappy"
    "typeOfData"      = "file"
  }

  storage_descriptor {
    location      = "s3://${aws_s3_bucket.cold_bucket.bucket}/meteo-station/"
    input_format  = "org.apache.hadoop.hive.ql.io.parquet.MapredParquetInputFormat"
    output_format = "org.apache.hadoop.hive.ql.io.parquet.MapredParquetOutputFormat"

    ser_de_info {
      name                  = "stream"
      serialization_library = "org.apache.hadoop.hive.ql.io.parquet.serde.ParquetHiveSerDe"
      parameters = {
        "serialization.format" : 1,
      }
    }

    parameters = {
      "classification"              = "parquet"
      "compressionType"             = "snappy"
      "typeOfData"                  = "file"
      EXTERNAL                      = "TRUE",
      "partition_filtering.enabled" = "true"
    }

    columns {
      name = "timestamp"
      type = "bigint"
    }

    columns {
      name = "temperature"
      type = "double"
    }

    columns {
      name = "atm"
      type = "double"
    }

    columns {
      name = "humidity"
      type = "int"
    }
  }
}
Last but not least, the index definition to make data access for the partition values much faster.
// glue_cold.tf

resource "aws_glue_partition_index" "meteodata_cold_meteo_station_table_idx" {
  database_name = aws_glue_catalog_database.meteodata_cold_database.name
  table_name    = module.meteodata_cold_meteo_station.table_name

  partition_index {
    index_name = "device_id_date_idx"
    keys       = ["device_id", "date"]
  }
}
It's time to apply the changes and run the meteodata_cold_meteo_station_crawler crawler to discover partitions and make data available for Athena. If we have that done, we can go to Athena consoel and run an example query:
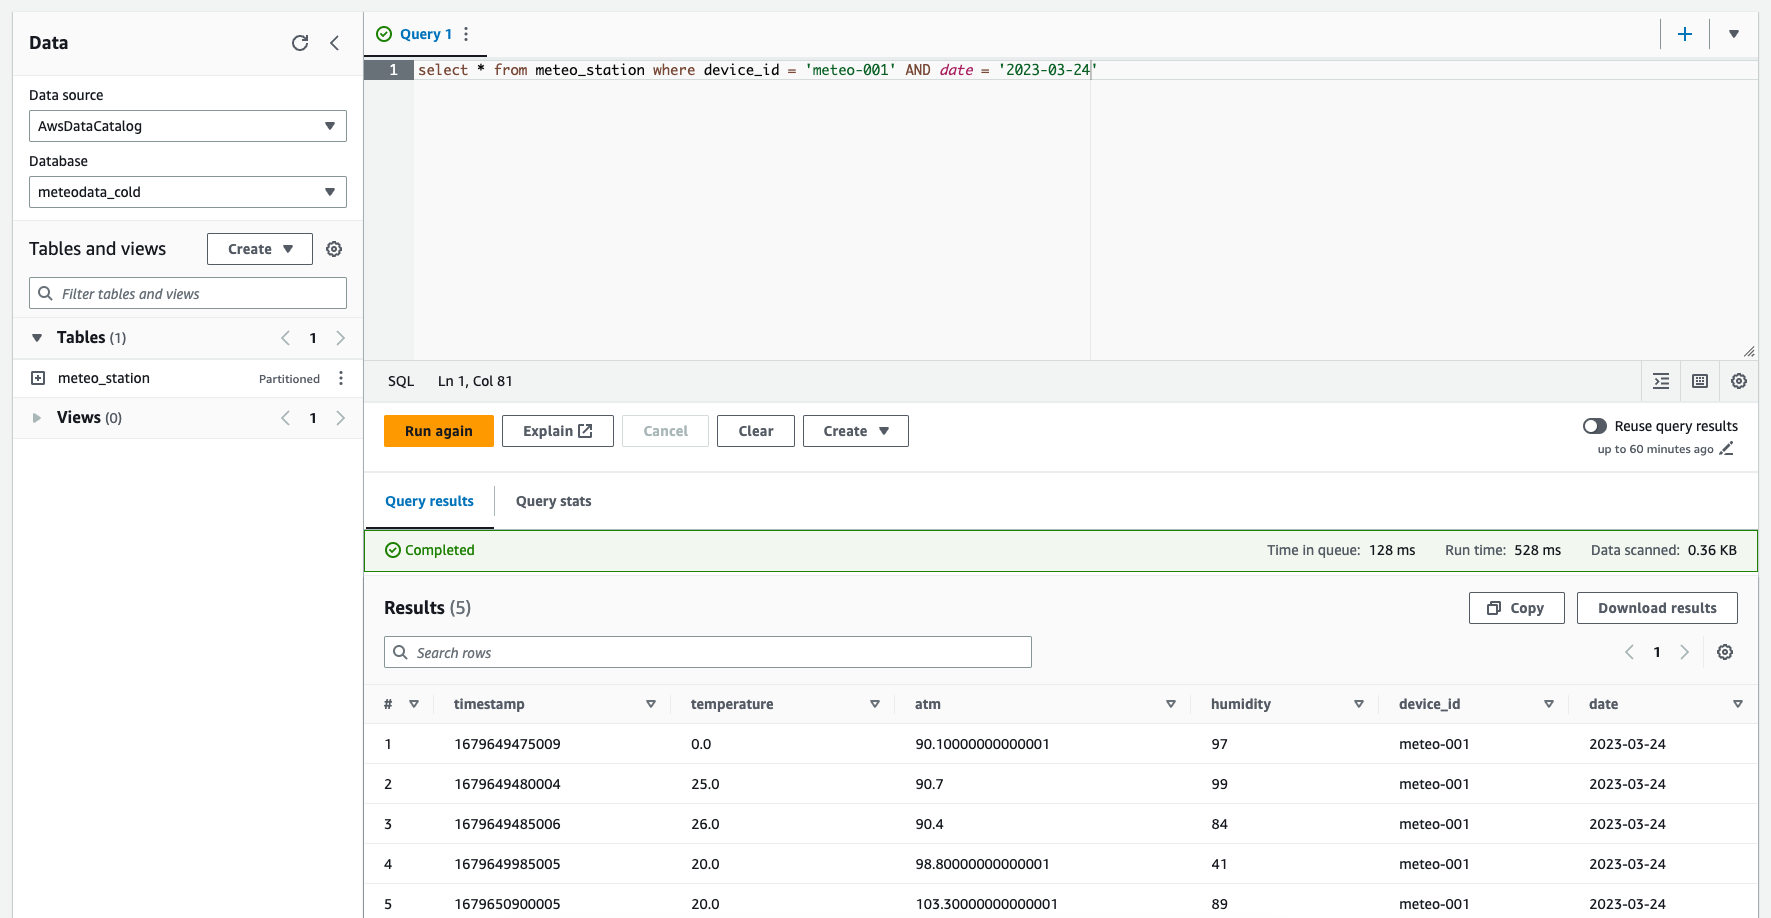
Number of records found should match the number of files in the raw bucket. The data has been transformed and now can be used to populate e.g. Quicksight for further analysis.
Summary
That's all for now regarding processing of IoT data. I hope you find it useful and understand the basics regarding the subject. We have touched many topics, like IoT rules and actions, role of crawlers, etl jobs, glue catalog, Athena, parquet files, structuring the data in S3 buckets and much more. If you find it interesting, I encerague you to go to AWS documentation to dive deep into more advanced concepts of that and have a better understanding of different approaches to solve IoT challanges.
There would be a few more posts related to AWS Analytics, so stay tuned!
All the code, infrastructure and the etl job, is available on github.