Athena to read IoT data (part 1)
Introduction
This is a first post related to processing IoT data levaraging AWS Analytics services. We will build an end to end solution to store and process IoT device data to make it available for Athena and other Analytics services for further processing.
High level diagram for the solution look following.
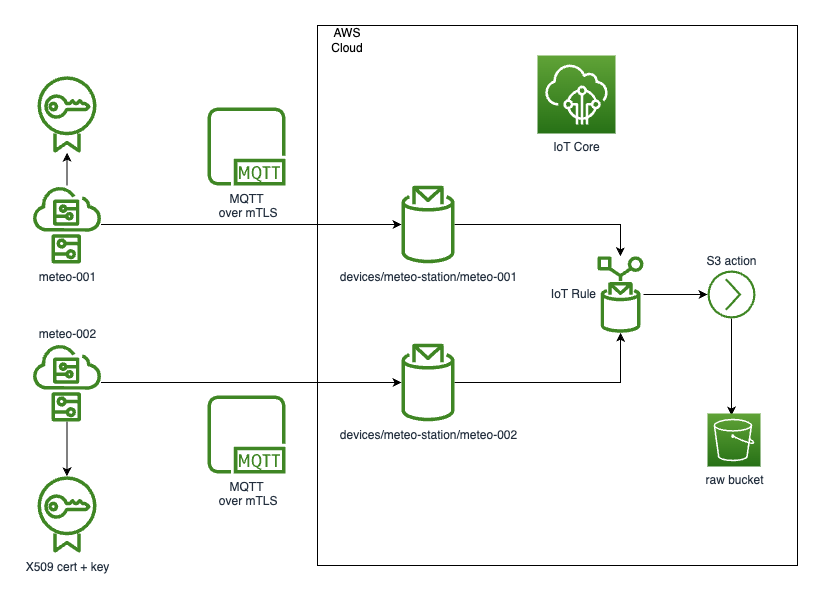
These are our main requirements:
- Use MQTT protocol to establish a connection between a thing and AWS IoT Core.
- Why MQTT? MQTT is a lightweight publish/subscribe protocol designed for Internet of Things. It integrates very well with AWS IoT Core.
- Secure a connection with mTLS.
- Why mTLS? mTLS ensures that the traffic is secure and trusted in both directions, providing additional layer of security for your data.
- Utilize IoT Rules and Actions to store device's raw data in S3.
- Why IoT Rules and Actions? IoT Rules and Actions give your device the ability to interact with other AWS services out of the box, based on the MQTT payload/topic data.
- Provision infrastructure with IaC solution.
- Why IaC? There is a lot of benefits of using IaC. It makes your solution re-usable, portable, it reduces a risk of human error and much more. And in our case, you can easily destroy all the resources after you are done with your work and testing.
You do not need to worry about meteo sensors. We will develop a simulator that will replace a real device and help us in providing real time data.
Prerequisites
- Terraform installed to provision the infrastracture
- Access to AWS account to deploy the solution
- Understanding of AWS and IaC concept. We will be creating real AWS services, which can cost real money
- NodeJS to develop and run a thing simulator
- Basic TypeScript and Terraforn knowledge
Terraform setup
It is a good practice to store Terraform state in a remote location. In our case, we will store it in the S3 bucket in an account where our service will be provisioned. If you do not have one ready, you need to create it (eiter via AWS CLI or AWS Console). Or you can keep it simple and store the state in local file system.
In my case, I chose the remote location and bucket name will be iot-analytics-terraform-state. Apart from that, we need to define our cloud provider (AWS) and some default tags that will be attached to every resource created by a provider. Finally, the content of main.tf can look as below:
terraform {
  required_providers {
    aws = {
      source  = "hashicorp/aws"
      version = "~> 4.0"
    }
  }

  backend "s3" {
    bucket  = "iot-analytics-terraform-state"
    key     = "terraform/iot-analytics/terraform.tfstate"
    region  = "eu-west-1"
    encrypt = "true"
  }
}

provider "aws" {
  region = "eu-west-1"

  default_tags {
    tags = {
      project     = "iot-analytics"
      managed-by  = "Terraform"
    }
  }
}
Now you can call terraform init to initialize the state and the plugins. Once that is completed, you can run terraform plan to verify if your initial setup is ready. If the two commands executed without error you can go to the next step.
Thing module
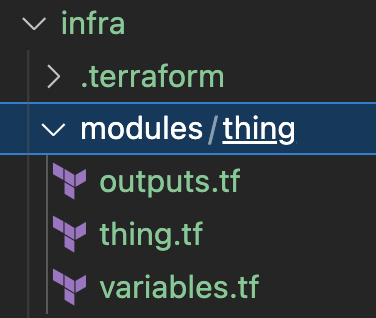
Since we want to test the solution with at least two different devices, each one with its own certificate and other parameters, let encapsulate that functionality into a separate module. In order to do so, create a modules/thing directory in your project's workspace with 3 files: variables.tf, thing.tf, outputs.tf. It should look as below:
We want our module to be configured with 3 input parameters:
- Thing unique identifier
- A group name the thing should belong to
- A location where the certificate for the thing will be stored
Let's start with putting some content to variables.tf:
variable "thing_group" {
  description = "Thing group name"
  type        = string
}

variable "thing_id" {
  description = "Thing unique id"
  type        = string
}

variable "outputs_path" {
  description = "Certificate output path"
  type        = string
}
Once we have defined parametes for the module, let's implement a thing resources now.
First of all, we need to define a thing and assigne it to the group. For that case, we will use module's variables.
resource "aws_iot_thing" "thing" {
  name = "${var.thing_group}-${var.thing_id}"
}

resource "aws_iot_thing_group_membership" "thing_group_membership" {
  thing_name             = aws_iot_thing.thing.name
  thing_group_name       = var.thing_group
  override_dynamic_group = true
}
The group itself will be created outside the module. The above resource thing_group_membership just assignees the thing to existing group by its name.
Now, let's work on relevant resources that will let a thing to connect to AWS and publish messages to a topic. We assume every thing will publish to its own topic. We will define the topic name matching the patter /devices/{group}/{thing-id}, so in our case it would be /devices/meteo-station/meteo-001
resource "aws_iot_certificate" "thing_certificate" {
  active = true
}

resource "aws_iot_thing_principal_attachment" "cert_attachment" {
  principal = aws_iot_certificate.thing_certificate.arn
  thing     = aws_iot_thing.thing.name
}
Yes, that's enough to create a certificate for a thing.
There is still a few more resources needed to let the thing to connect to MQTT gateway and publish messages to a topic. Let's start with defining a policy based on the example:
data "aws_arn" "thing" {
  arn = aws_iot_thing.thing.arn
}

data "aws_iam_policy_document" "thing_policy_document" {
  statement {
    sid = "connect"
    actions = [
      "iot:Connect"
    ]
    resources = [
      "arn:aws:iot:${data.aws_arn.thing.region}:${data.aws_arn.thing.account}:client/${var.thing_id}"
    ]
  }
  statement {
    sid = "communicate"
    actions = [
      "iot:Publish",
      "iot:Receive",
    ]
    resources = [
      "arn:aws:iot:${data.aws_arn.thing.region}:${data.aws_arn.thing.account}:topic/devices/${var.thing_group}/${var.thing_id}"
    ]
  }
  statement {
    sid = "subscribe"
    actions = [
      "iot:Subscribe"
    ]
    resources = [
      "arn:aws:iot:${data.aws_arn.thing.region}:${data.aws_arn.thing.account}:topicfilter/${var.thing_group}/${var.thing_id}"
    ]
  }
}
As you can see, the policy is quite strict, we do not use any wildcards here. We allow only a thing to publish to its own topic and not more.
Now, it's time to attach the document to a policy and bind it with the certificate. With that every device (based one the defined thingId) will be able to use a certificate and publish to its own topic.
resource "aws_iot_policy" "thing_policy" {
  name   = "thing_policy_${aws_iot_thing.thing.name}"
  policy = data.aws_iam_policy_document.thing_policy_document.json
}

resource "aws_iot_policy_attachment" "policy_attachment" {
  policy = aws_iot_policy.thing_policy.name
  target = aws_iot_certificate.thing_certificate.arn
}
We are now approaching to the end of the thing module definition. The last but not least is to define the module's output variables.
For sure we need the module to export the certificate and private key. To achieve that, we will use the output from the aws_iot_certificate resource.
resource "local_file" "thing_certificate_cert" {
  content  = aws_iot_certificate.thing_certificate.certificate_pem
  filename = "${var.outputs_path}/${var.thing_group}/${var.thing_id}/cert.pem"
}

resource "local_file" "thing_certificate_private_key" {
  content  = aws_iot_certificate.thing_certificate.private_key
  filename = "${var.outputs_path}/${var.thing_group}/${var.thing_id}/private.key"
}
It will store the data in the provided location and corresponding directory for a thing group/thing id.
That's all for the thing module. Now, it's time to setup the IoT Core resources to handle and store our sensors data.
IoT Core and flow setup
We need to return for a while to the architecture diagram to see what actually we need to provision to meet the requirements. And briefly it is:
- Bucket to store raw data.
- Things itself - we just created a module, now we need to use it.
- Rule to store the sensors data in the bucket
Create a iot.tf file and start putting some content in it.
Let's begin with the requirement #1. You need to think about the bucket name that will be unique across the region you provision your resources in.
resource "aws_s3_bucket" "raw_bucket" {
  bucket = "put.your.fancy.name.here"
}

resource "aws_s3_bucket_acl" "raw_bucket_acl" {
  bucket = aws_s3_bucket.raw_bucket.id
  acl    = "private"
}
Yes, that's all needed for our testing/demo purpose. In case of production deployment, you would need to add couple of more resources according to AWS best practices (encryption, storage classes, etc.), but this is a demo so keep it simple.
Now, we can go the the step number 2. That would be also quite straightforward with just a few resources. This is possible due to the fact that we already encapsulated all the logic to provision a single thing. Since we need more then one sensor let's start with creating a variable defining ids of the things to be created.
locals {
  things = ["meteo-001", "meteo-002"]
}
Now we can create a thing group and things attached to that group.
resource "aws_iot_thing_group" "meteo_stations_group" {
  name = "meteo-station"
}

module "thing" {
  for_each     = toset(local.things)
  source       = "./modules/thing"
  thing_group  = aws_iot_thing_group.meteo_stations_group.name
  thing_id     = each.key
  outputs_path = "./cert"
}
We are leveraging for_each loop to go through all our sensors and create required resources for it. The certificates will be generated and stored in the ./cert/meteo-station/meteo-001 and ./cert/meteo-station/meteo-002 directories.
And now it's time to create an IoT Rule to store the incomming data in S3 bucket we created in step #1. Before we go to that, we need to create a role with allow s3:PutObject that will be assumed by IoT rule. So, here is the role definition
data "aws_iam_policy_document" "iot_assume_role_policy" {
  statement {
    actions = ["sts:AssumeRole"]

    principals {
      type        = "Service"
      identifiers = ["iot.amazonaws.com"]
    }
  }
}

data "aws_iam_policy_document" "iot_write_to_raw_bucket_policy" {
  statement {
    sid       = "AllowPutObject"
    actions   = ["s3:PutObject"]
    resources = ["${aws_s3_bucket.raw_bucket.arn}/*"]
  }
}

resource "aws_iam_role" "iot_raw_bucket_write_role" {
  name               = "iot-raw-bucket-write-role"
  assume_role_policy = data.aws_iam_policy_document.iot_assume_role_policy.json
}

resource "aws_iam_role_policy" "iot_raw_bucket_write_role_allow_s3_put" {
  name   = "allow-s3-raw-bucket-put"
  role   = aws_iam_role.iot_raw_bucket_write_role.name
  policy = data.aws_iam_policy_document.iot_write_to_raw_bucket_policy.json
}
To create a rule and action we will use aws_iot_topic_rule rule. It has variety of settings. Some of them are self explanatory, but another would need a few words to make them clear.
What we want to achieve is to have a single rule to read input data from all our devices and store in S3 in a way that would be easy to read and analyze later on. There can be sifferent approaches, but we can start with following key patter for the data s3://{group-name}/{thing-id}/{date of arriva\l}/{timestamp}.json, for instance /meteo-sensor/meteo-001/2023-02-09/1676658907184.json.
Since a thing will publish a data multiple times an hour, we could intorduce additional level for the key, but as it's just an example and not production case, let's keep it simple.
Firstly, we need to think how we want to achieve the first requirement, a single rule to process data from all devices (in our case, all topic).
IoT Core supports SQL-like syntax to read data from the topic. If we go further into documentation, we will find out we can use different wildcard patters to define the FROM clause. Since we know that we want to read from device/meteo-sensor/meteo-001 and device/meteo-sensor/meteo-002 we can generalize the topic name to 'device/meteo-sensor/+' (+ defines single level wildcard). So the final sql statement would be SELECT * FROM 'devices/meteo-sensor/+'.
Since we defined the input for our rule already, we should now focus on our second requirement and define the destination. Again, we will use IoT and SQL capabilities to define a key for the MQTT paylod. To cover our requirements we will use following functions:
- topic
- parse_time
- timestamp
The first one, topic let us to get the topic name (if no input parameter provided) or the segment (value from topic name splited by '/') if passed on a number. As we defined our rule with device/meteo-sensor/+ we have 3 segments, topic(1) will return device, topic(2) will give us the group name and topic(3) thing id. Knowing that we can start defining our destination key as
key = "${topic(2)}/${topic(3)}"
That would help us nicely partitioning the incoming data per thing group and identifier.
Now we need to extend the key using parse_time and timestamp functions. The first one will be needed to define date when the sample arrived. We will use it with the combination of the other one. We also need to make sure the sample will not be overrwriten within a day, so each file needs to be stored with unique name. We could achieve that using some uuid generator, but we can also utilize the timestamp function. To sum up, we can extend our key to the following formula:
key = "${topic(2)}/${topic(3)}/${parse_time("yyyy-MM-dd", timestamp())}/${timestamp()}.json"
And we can put all together into single resource (please note the double $$ - needed to properly be parsed by TF):
resource "aws_iot_topic_rule" "raw_bucket_rule" {
  name        = "raw_bucket_rule"
  description = "A rule to store raw payload in S3 bucket"
  enabled     = true
  sql         = "SELECT * FROM 'devices/${aws_iot_thing_group.meteo_stations_group.name}/+'"
  sql_version = "2016-03-23"

  s3 {
    bucket_name = aws_s3_bucket.raw_bucket.id
    role_arn    = aws_iam_role.iot_raw_bucket_write_role.arn
    key         = "$${topic(2)}/$${topic(3)}/$${parse_time(\"yyyy-MM-dd\", timestamp())}/$${timestamp()}.json"
  }
}
All the code is available on github.
We can deploy the changes now and using AWS console verify if all the resources were created and working as expected.
Testing
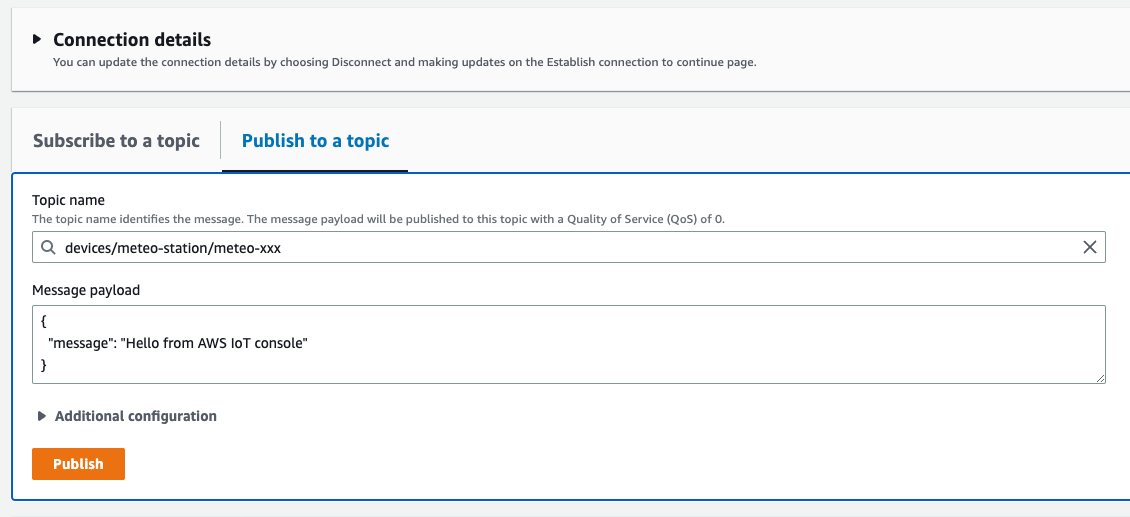
We do not have simulator yet, but we can use available AWS services to test some part of our solution. We will not be able to test the MQTT connection itself, but we can try to verify the IoT rule we have created. To do that you need to log-in to AWS console and select IoT Core service. It should redirect you the page where you can check if all the resources were created, see their settings etc. There is also one more interesting sub-page, MQTT test client.
We will use it to publish test message and verify if it was stored in the S3 location according to the formula we created. So, let's go to the test client and select 'Publish to topic' tab. Into topic name enter devices/meteo-station/meteo-xxx, keep all other setting with default values and press Publish (couple fo times if you wish).
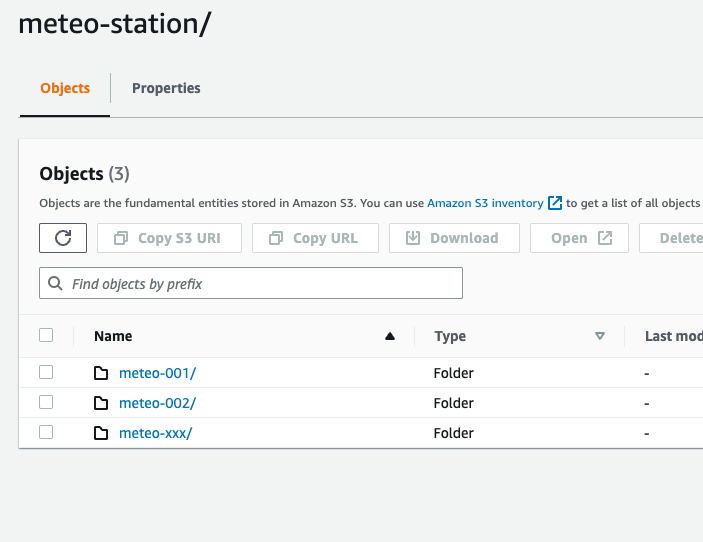
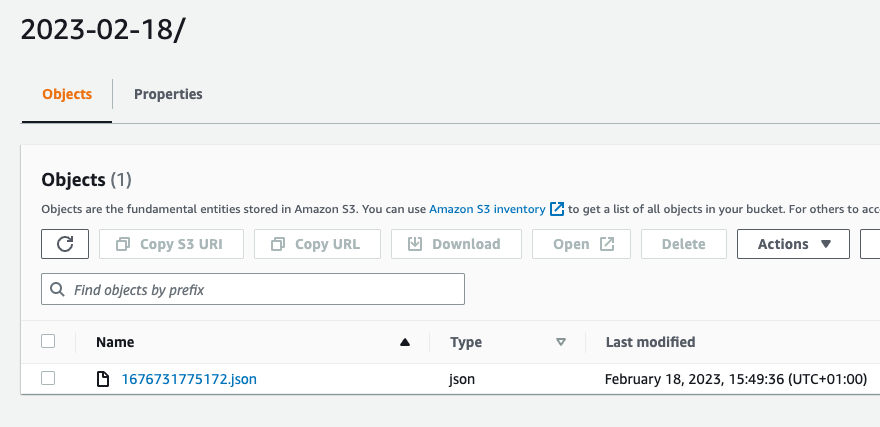
Now we can go to S3 and the bucket you created to store the raw data. There should be created meteo-station directory with another one meteo-xxx inside. If you go deeper you will find bunch of json files (basically a single file per publish a message).
Next steps
As you can see our rule is working as expected. Now, we need to generate example data to be processed later one. We could use the MQTT test client, but it will not be very convenient and we also would like to test MQTT connection. To make that happen we will build a simulator that pushes the data to our MQTT gateway.